This document assumes that you have a WordPress installation ready to use. This document assumes that the name of the theme is devtile and all file are contained in a directory entitled devtile. Ou goal is have a simple WP theme for displaying a front page, one default page template and one post template. Templates will have a header and a footer. The layout will be based on bootstrap and will be a block theme. Please note that there are other ways to create block themes, than described here. The concern of this document is creating a theme from scratch.
First Files
To create a new WordPress theme you need a three files.
/style.css
/theme.json
template/index.html.
This wont make an exciting theme but that is all you need. How go ahead and create those files in your devtile directory. For word press to accept these files as a valid theme then you need to put a few stuff in the header of your style.css as comments. These are:
/*
Theme Name: DevTile
Author: Webmaster
Description: Our Mini theme for devtile
Version: 1.0
*/
Now put that in your style.css. Save the file. Zip you directory into a single file and upload.
Activate the theme and have a look at you blog. You will see a page with a message “Empty template: Index“, which should not come as a surprise considering what you have done so far. Almost nothing.
Add the Page contents
Now create a post with some contents. Modify the contents of index.html (currently empty) and add
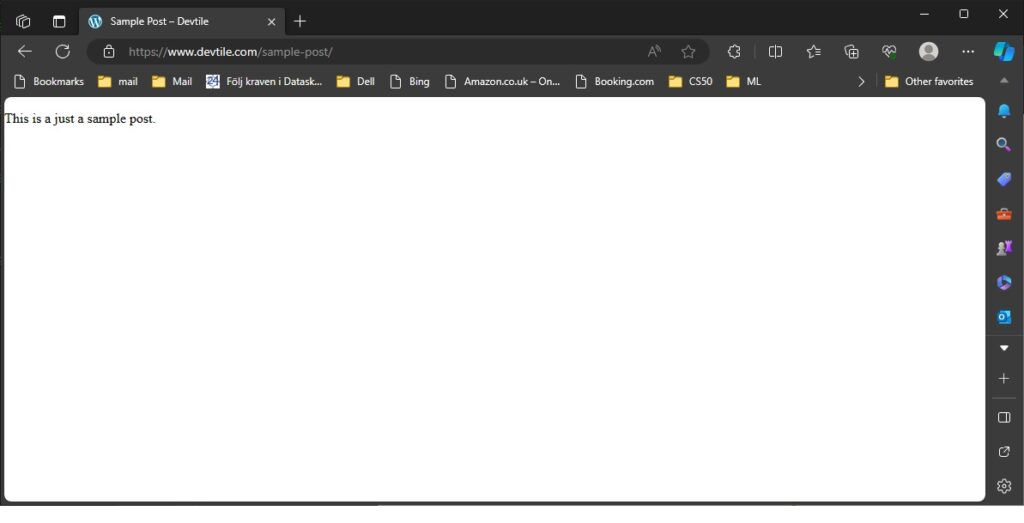
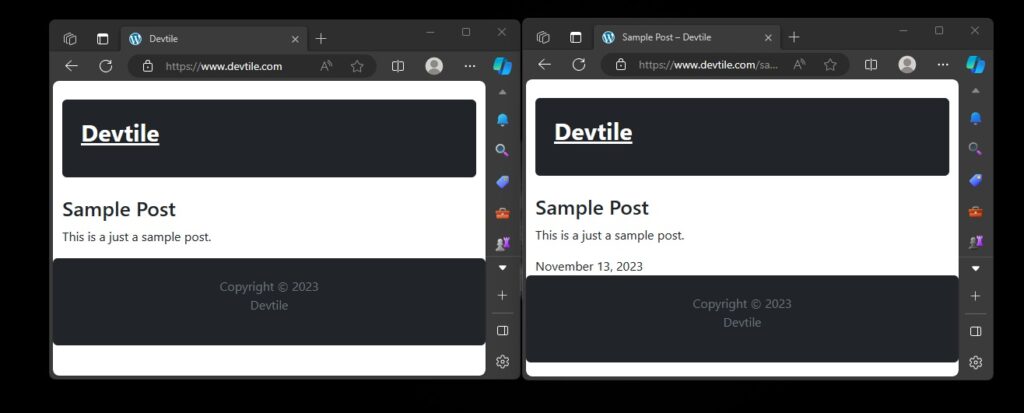
<!-- wp:post-content /-->Save your changes zip the file and reinstall the theme. Congratulations. You have just created your first theme. To view your newly created theme just create a sample post call it sample post and visit it. Not very exciting but it does the job. Here is what you will see.
No go ahead and put the following line on the top of index.html
<!-- wp:post-title /-->Zip and deploy and you can see that event the title of the post is displayed.
Some other markups you might want to experiment with are: wp:post-excerpt, wp:post-date, wp:post-author. You can get a complete list in WordPress block reference.
Adding Some Style
So far our sample post looks very simple. So lets try to add some style. My favorite style library is bootstrap. So lets start with to include bootstrap in our post. At the time of this writing the latest version is 5.3.2 :
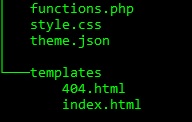
<link href="https://cdn.jsdelivr.net/npm/bootstrap@5.3.2/dist/css/bootstrap.min.css" rel="stylesheet" integrity="sha384-T3c6CoIi6uLrA9TneNEoa7RxnatzjcDSCmG1MXxSR1GAsXEV/Dwwykc2MPK8M2HN" crossorigin="anonymous">You first instinct might be to put above link in the index.html. Although this might work, if you look at the source code of the generated page you will see that the css link will be placed in body part of the document. We will not discuss the weirdness factor of having styles in the middle of the document and instead assume that you are a proper human being who likes the styles links in the header part. To do that we will create a new file in the root of the theme directory and call it functions.php. As you have already seen this file is not strictly required for a theme. However it is probably one of the most important files in your theme to modify WordPress behavior and inject all kinds of cool stuff into your document. So go ahead and create the file. You should have the following structure:
Edit the contents of functions.php to
<?php

wp_enqueue_style( 'bootstrap-css', 'https://cdn.jsdelivr.net/npm/bootstrap@5.2.3/dist/css/bootstrap.min.css');

?>
This will add the bootstrap css to the document. Go ahead and create the theme and install. You should see some nice changes in your document now.
Since bootstrap is much nicer and flexible with the javascripts go ahead and add that too. Your functions.php should be something like:
<?php

wp_enqueue_style( 'bootstrap-css', 'https://cdn.jsdelivr.net/npm/bootstrap@5.2.3/dist/css/bootstrap.min.css');

wp_enqueue_script( 'bootstrap-js', 'https://cdn.jsdelivr.net/npm/bootstrap@5.2.3/dist/js/bootstrap.min.js', array( 'jquery' ), '4.6.0', true);

?>
Create the layout
So far we have created a default template for all posts and pages and included bootstrap styles in that page. Let oss now start with a layout. This part will be based almost entirely on bootstrap. What we want to create a a simple responsive page with a header, the contents of the page and a footer. The header include the name of the site. The body will include the contents of the post or page and the footer will include a copy right message. To do this edit your index.html and replace the contents with:
<!-- index.html -->
<!-- page header -->
<section class="py-4 py-xl-5">
    <div class="container">
        <div class="text-white bg-dark border rounded border-0 p-4 p-md-5">
            <!-- wp:site-title {"className":"fw-bold text-white mb-3"} /-->
        </div>
    </div>
</section>

<!-- page contents -->
<div class="container">
    <!-- wp:post-title /-->
    <!-- wp:post-content /-->
</div>

<!-- page footer -->
<footer class="text-center ">
    <div class="container bg-dark text-muted py-4 py-lg-5 border rounded border-0 p-4 p-md-5">
        <p class="mb-0">Copyright © 2023</p>
		<!-- wp:site-title {"isLink": false, "level" : 0} /-->
    </div>
</footer>
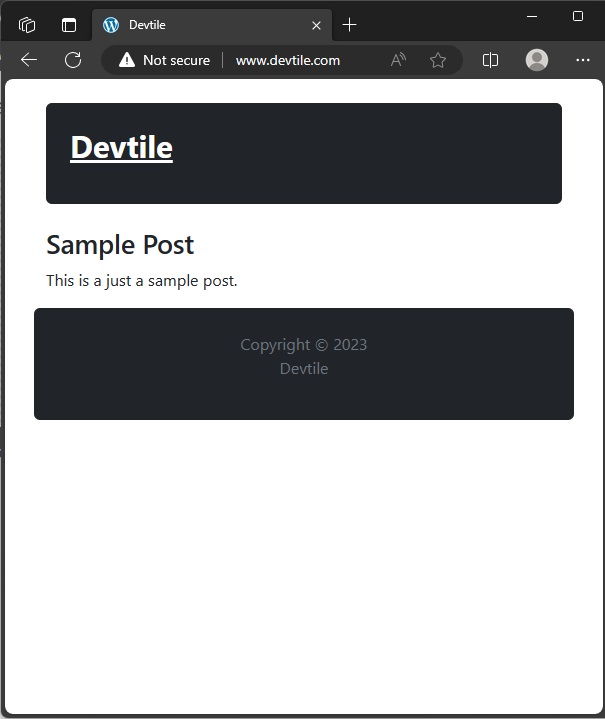
What might be new here is the wp:site-title which outputs the site title with a link to the site. You might want to pay some attention to the wp:site-title {"className":"fw-bold text-white mb-3"} in the header which adds an attribute className to instruct the renderer that the element rendered should have the list of classes. Additionally the same markup in the footer wp:site-title {"isLink" : false, "level" : 0} has the attributes isLink and level set. The former specifies if the title is to be linked to the site domain. The latter, the level attribute tells the renderer to not wrap the title in an header 1 (“h1”) element, and use a paragraph (“p”) instead. Most WordPress markups have properties that control the rendering and functionality of what is being rendered. The classes added the the site title in the header rest are simple bootstrap stuff that will not be covered in this document.. Anyway zip and install! Huge difference:
A single page (single.html)
The index.html template on which we have been working so far is the template used as default whenever a dedicated template is used. In a WordPress theme you can have a dedicated template to show a single page or post. Lets go ahead. Make a copy of index.html and rename it to single.html and change the comment on top to <!-- single.html -->. Also to make them easily distinguishable lets add the publishing date of the post to the template . Here is what it might look like:
<!-- single.html -->
<!-- page header -->
<section class="py-4 py-xl-5">
    <div class="container">
        <div class="text-white bg-dark border rounded border-0 p-4 p-md-5">
            <!-- wp:site-title {"className":"fw-bold text-white mb-3"} /-->
        </div>
    </div>
</section>

<!-- page contents -->
<div class="container">
    <!-- wp:post-title /-->
    <!-- wp:post-content /-->
    <!-- wp:post-date /-->
</div>

<!-- page footer -->
<footer class="text-center ">
    <div class="container bg-dark text-muted py-4 py-lg-5 border rounded border-0 p-4 p-md-5">
        <p class="mb-0">Copyright © 2023</p>
		<!-- wp:site-title {"isLink": false, "level" : 0} /-->
    </div>
</footer>
No if you visit the site domain you will see the sample post without the date and if you visit the post using its own URL you will see the post with its date.
Header & Footer
Now we have two different document templates for two different situations that look very similar. Lets see if we can optimize them. The most obvious part would be to break out the header and the footer and reuse them in both templates.
first create a subdirectory in your theme directory named parts. Create two files named header.html and footer.html respective. Copy the header part and the footer part from index.html (or single.html) and paste them in the corresponding part. The contents should be something like this:
header.html
<!-- header.html -->
<!-- page header -->
<section class="py-4 py-xl-5">
    <div class="container">
        <div class="text-white bg-dark border rounded border-0 p-4 p-md-5">
            <!-- wp:site-title {"className":"fw-bold text-white mb-3"} /-->
        </div>
    </div>
</section>
footer.html
<!-- footer.html -->
<!-- page footer -->
<footer class="text-center ">
    <div class="container bg-dark text-muted py-4 py-lg-5 border rounded border-0 p-4 p-md-5">
        <p class="mb-0">Copyright © 2023</p>
		<!-- wp:site-title {"isLink": false, "level" : 0} /-->
    </div>
</footer>
and index.html
<!-- single.html -->

<!-- wp:template-part {"slug":"header"} /-->

<!-- page contents -->
<div class="container">
    <!-- wp:post-title /-->
    <!-- wp:post-content /-->
	<!-- wp:post-date /-->
</div>

<!-- wp:template-part {"slug":"footer"} /-->
Notice the wp:template-part that includes the parts in the template. The slug is the name of the template part. The index.html should be modified in a similar manner. Visually there should be no difference.
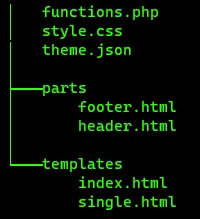
Here is the current file structure
The Front Page Template
The first impression lasts. One of the most important pages on your website is its front page. In a WordPress theme you can have a template dedicated to that. That template will be oddly called front-page.html and has to be placed in the same directory as other ones.
The Archive (archive.html)
Coming soon
Page Not Found 404
Create a new html file in the themes templates directory and put the contents:
<p>Page Not Found</p>Now pack and deploy your theme again and then try to visit a non existing page. You should get the message above.
Create a Simple Pattern
To start with lets have a quote from the don’t of the WordPress official sited page on paterns:
Overly simplistic patterns, like a single Paragraph with colors don’t save time or present a compelling purpose.
Which is exactly what we are going to do to illustrate how you can add patterns to your theme.
Start by creating a sub-directory in your theme directories root called patterns.
In that directory create a file called simple-pattern-1.php, with the following contents:
<?php
/**
 * Title: simple-pattern
 * Slug: devtile/simple-pattern
 * Categories: featured
 */
?>
<!-- Pattern code goes here. -->
<p>THE SIMPLE PATTERN!</p>
Now pack and install your theme and create a new document. You Should be able to see your new pattern in the editor as shown below:
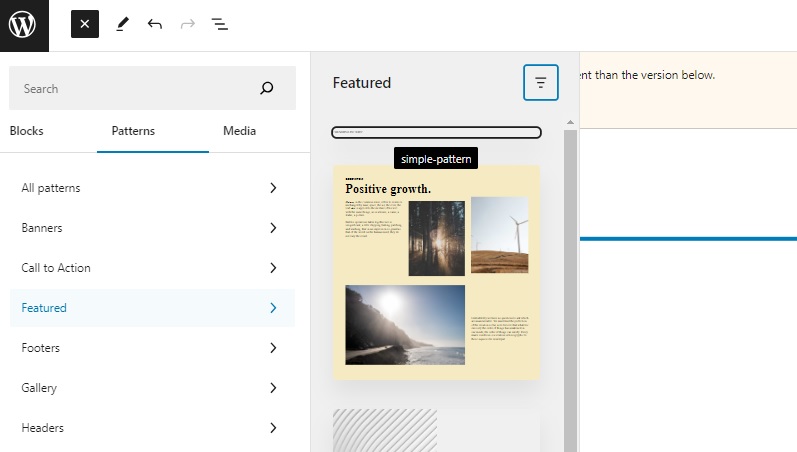
Adding the pattern in the document should add the paragraph “THE SIMPLE PATTERN” to your document. Feel the magic!
Create a Simple Block
WordPress offers a lot of pre-made blocks. But of course it is a lot of fun to be able to develop your own as well. Blocks offer a very nice modular way of designing your page. They can either be part of your templates in the theme or be added as later as part of your page.
To get started create a directory under your themes directory and call it blocks. In that directory create a new directory called simple-message. In the simple-message directory create a new file called block.php.